-1.png?width=240&height=100&name=Heading%20(2)-1.png)
There are various types of fundraising activities that take place during a typical fundraising event. These activities are participation and winning a silent auction items, participation and winning of live auction items, paddles up/fund-a-need contributions, any raffle tickets or items that are for sale that people may have been purchased throughout the event. All of these purchases and commitments get added to the event shopping cart. Every guest who registers gets a shopping cart of their own and as they participate in the event their shopping cart gets filled with those items that they committed to. When an auction item is marked as awarded to the bidder, that item is also added to the bidder's shopping cart, ready to check out.
End Auction
- If you do have an Auction as part of your event you will need to go into your auction and End Auction. (Status -> End Auction)

- Once you have Ended your Auction you will then need to go through each Auction item and Award it to the winner.
- Once the auction item is awarded those items get added to the guests shopping cart along with anything else that they may have participated in.

- After you have gone through and processed your auction item winners, proceed to guest cart and now your guest cart should be up to date with all of the purchases including all the auction item winners.
- In your Guest carts page, review all cart contents and check out each guest cart, processing payments.
Guest Carts & Check Out
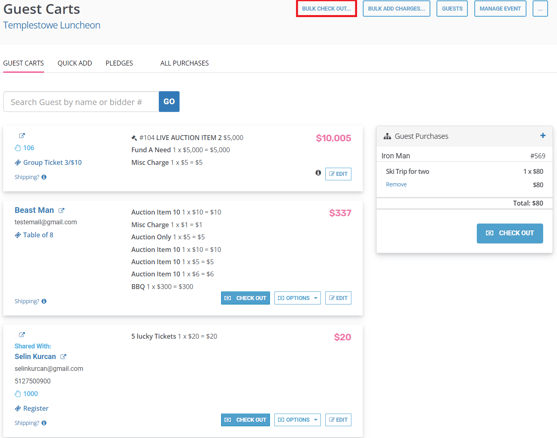
- Guest Carts allows you to look up particular Guest's Carts by Search or click Show All and see all carts with items in them.
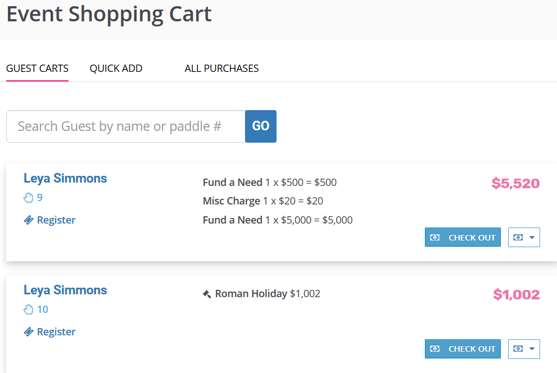
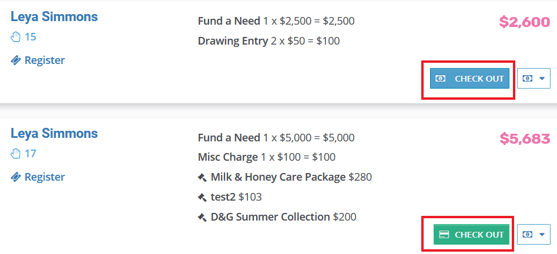
- At the end of your event, you will go through and checkout each guest. If the Checkout button is green, that means your guest has a preauthorized card and you can simply click through to verify the cart items and charge their card. If the button is blue, that means your guests has NOT preauthorized a card and you can either click check out to enter a card number or select the drop down button next to it with the money icon to take an offline payment (cash or check).
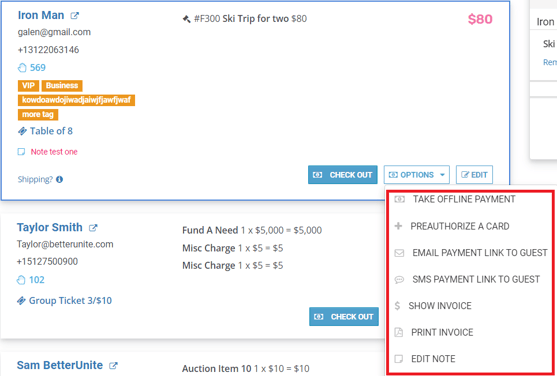
- There are also several options available for each guests cart:
- Take Offline payment: Where the guest has requested to pay by cash or check
- Preauthorize a card: Where the guest wants to put their card details in for the first time or if they already have their card details in but they are requesting to switch to another card.
- Email Payment Link To Guest: Send the guest a link via email, so they can checkout on their personal device.
- SMS Payment Link to Guest: Send an SMS message to the guest with a payment link so they can checkout on their personal device.
- Show Invoice: Preview a copy of an invoice for the guest.
- Print Invoice: Print out a paper copy of the invoice for the guest.
- Edit Note: Add or edit notes concerning this particular Guest Cart.
- If you click the blue Checkout button, you will be taken to a checkout page with an itemized list of purchases or donations and you can send this checkout URL to your guest so that they may check themselves out as well.
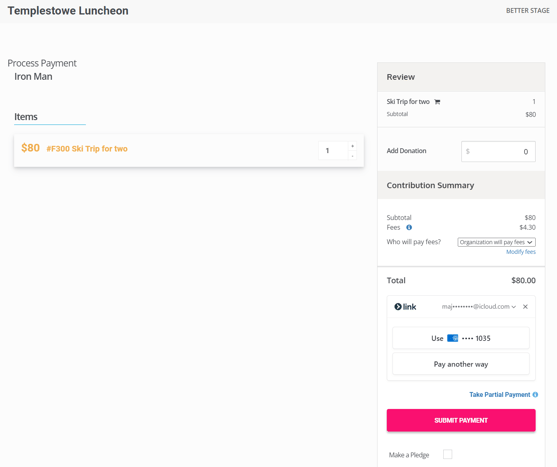
- The check out page will display all items in the guest's cart, and you will be able to add/modify the cart before completing the transaction.
- Once you complete the check out, the cart is cleared, and the guest is sent a notification of charges, and the transaction is added to the application for that guest/contact.
Bulk Check Out
- If you have a number of guest carts and you would like to check them out all at once you can do so by choosing Bulk Check Out on the Guest Carts page as shown below.
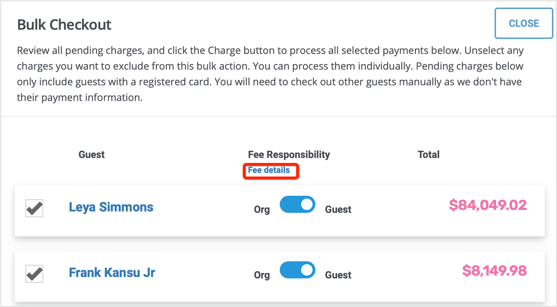
- Once you click Bulk Checkout, only guests with registered cards will appear in the list. You can deselect any charges you want to exclude from this bulk action. Depending on your funding settings, processing fee responsibility will be assigned to either the Organization or the guest.
- For any guest or all of your guests you can toggle the Combined Fee Responsibility to the guest on this page before you click Charge Selected Purchases.
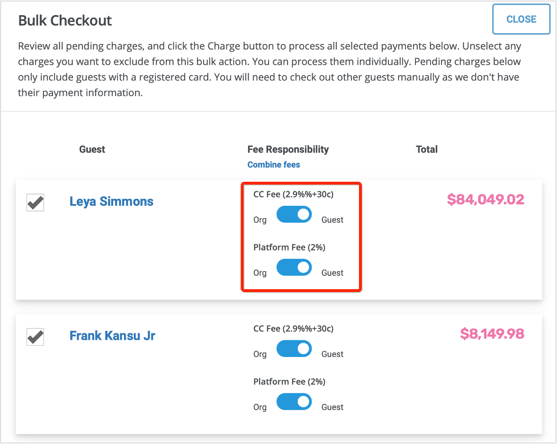
- You can also break down the fees during bulk checkout. You can toggle between detailed view versus combined view by clicking the links shown below.
- In the Detailed Fees View you can toggle each fee either to the Organization or the Guest as shown below.
Guest Messaging
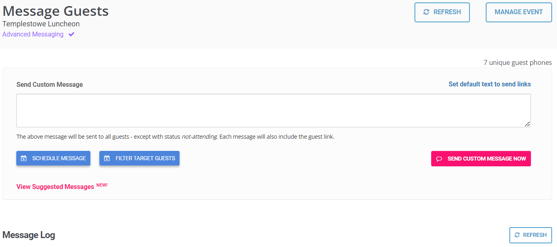
- After your event ends, consider sending a custom thank-you message to your guests. You can do this from the Guest Messaging tab on your Manage Event page.
- Note: The Custom Messaging package must be purchased before you can send custom messages.
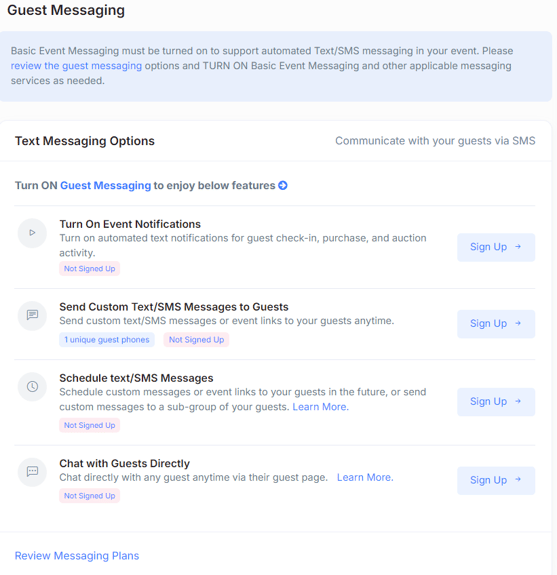
- Once you are in the Message Guests page, enter your message and click Send Custom Message Now as shown below.
- If you click View Suggested Messages, you can view some samples of texts that you may consider sending out for your event/campaign.
Event Completed
- When you have reconciled all transactions and sent all communications, go to the Actions menu on your Manage Event page and select Mark as Completed. The event will then be removed from your active events list. in the active events list.
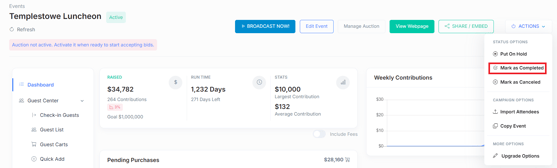
- Once marked as completed your event will continue to show in the inactive events section
Event Reports
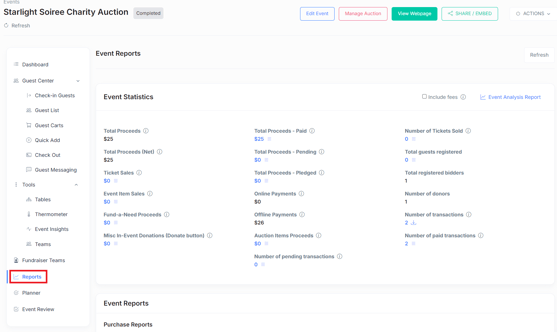
- Click on Reports on the Manage Event page. The Reports page produces a summary of your event activities including your donations, auction items, guest information as well as auction bidding information.
- You can view detailed information about ticket sales, event purchases, and every bid placed during your event. For in-person events, the report also includes table numbers and seating assignments.
Need Additional Help?
We're here to assist you in any way we can. Don't hesitate to reach out to support@betterunite.com
Let's go do some good.