-1.png?width=240&height=100&name=Heading%20(2)-1.png)
BetterUnite lets you add unlimited team members to your account and tailor each person's access to match their role. You can grant broad access for administrators, restrict access to specific modules, or limit a user to a single campaign.
Getting to User Management
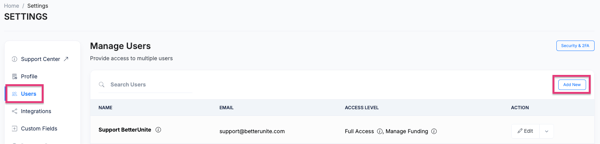
From anywhere in BetterUnite, navigate to Settings > Users and click Add New. The Manage User panel will open.
Understanding Access Levels
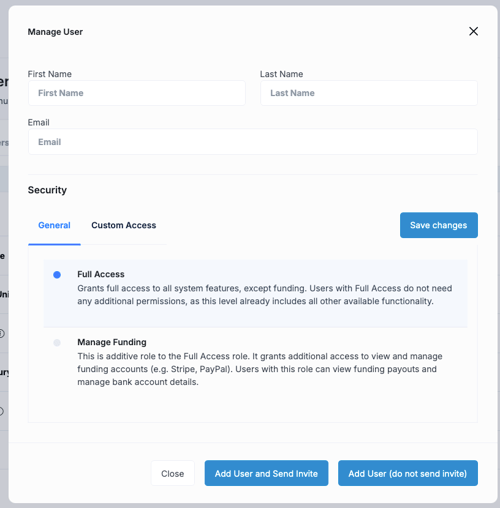
Every new user is assigned one of two general access levels on the General tab, or you can switch to fully custom permissions using the Custom Access tab.
Full Access
Grants access to all system features except funding. A Full Access user can manage events, contacts, donations, communications, memberships, and auctions — but cannot view or manage payment processors (Stripe, PayPal) or bank account details. This is the right choice for most staff and volunteers.
Manage Funding
This is an additive role that layers on top of Full Access. A user with both Full Access and Manage Funding can view funding payouts and manage bank account and payment processor details. Only assign this to users who need access to your financial accounts.
Custom Access
Lets you define exactly which modules and actions a user can perform. Use this for volunteers, event check-in staff, or any team member who should only see a specific part of BetterUnite. See Adding a User with Custom Access below.
Adding a Full Access User
- Go to Settings > Users and click Add New.
- Enter the user's First Name, Last Name, and Email.
- On the General tab, select Full Access. If this person also needs to manage payment processors, check Manage Funding as well.
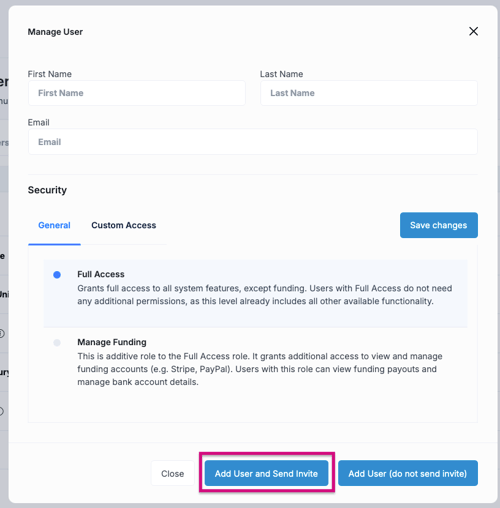
- Choose how to add the user:
- Add User and Send Invite — sends an invitation email with a link for the user to create their password. A unique password-creation link is also displayed on screen for you to share directly. Note: the invitation email expires after 24 hours.
- Add User (do not send invite) — adds the user to your account without sending an email. You can resend the invitation later.
Adding a User with Custom Access
Custom Access lets you hand-pick exactly what a user can see and do. Because campaign-level permissions require the user to exist in the system first, there is a two-step process.
Step 1 — Create the user
- Go to Settings > Users and click Add New.
- Enter the user's First Name, Last Name, and Email.
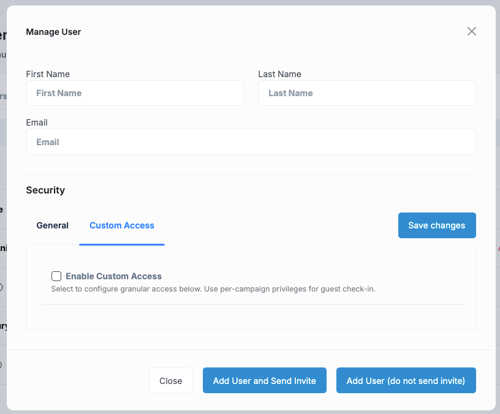
- Click the Custom Access tab.
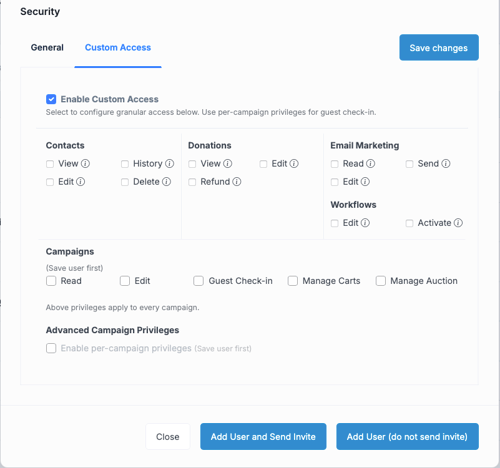
- Check Enable Custom Access.
Step 2 — Set permissions
Once Custom Access is enabled, select the specific permissions this user needs:
- Contacts — View, History, Edit, Delete
- Donations — View, Edit, Refund
- Email Marketing — Read, Send, Edit
- Workflows — Edit, Activate
- Campaigns — Read, Edit, Guest Check-in, Manage Carts, Manage Auction
These permissions apply to every campaign in your account.
Step 3 — Save, then configure Advanced Campaign Privileges (optional)
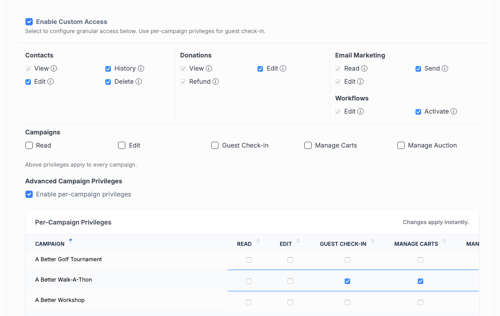
If you want to give this user access to only specific campaigns rather than all campaigns, use Advanced Campaign Privileges. This option becomes available after you save the user.
- Click Add User and Send Invite or Add User (do not send invite) to save the user.
- Find the user in the Users list, click Edit, and return to the Custom Access tab.
- Under Advanced Campaign Privileges, check Enable per-campaign privileges.
- Assign access to individual campaigns as needed. This is ideal for event check-in staff who should only see one event.
Managing Existing Users
You can manage any user from the Settings > Users list at any time.
- Edit access — Click Edit next to a user to update their name, email, or permissions.
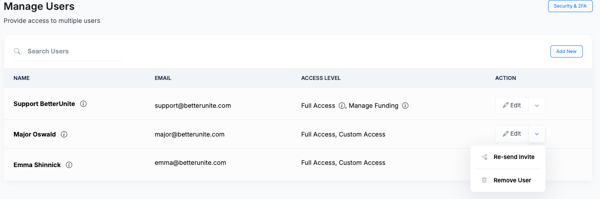
- Resend invitation — Click the caret (▾) menu next to the Edit button and select Resend Invite. Use this if a user's invitation email expired or they didn't receive it.
- Remove a user — Click the caret (▾) menu and select Remove to revoke access.
Frequently Asked Questions
The invitation email expired. Can I resend it?
Yes. Go to Settings > Users, find the user, click the caret menu (▾), and select Resend Invite. When you first add a user, a unique password-creation link is also shown on screen — you can copy and share that link directly as an alternative.
Can a user have both Full Access and Custom Access?
No — each user is set to either General (Full Access ± Manage Funding) or Custom Access. You can switch between modes at any time by editing the user.
What does Manage Funding include?
Manage Funding lets the user view funding payouts and manage bank account and payment processor details (Stripe, PayPal). It must be paired with Full Access — it is not available on its own or under Custom Access.
Can I give a check-in volunteer access to only one event?
Yes. Add the user with Custom Access, save them, then return to their profile and enable Advanced Campaign Privileges under the Custom Access tab. You can then grant Guest Check-in permission for a specific campaign only.
What happens if I add a user without sending an invite?
The user is added to your account but receives no email. Their account will be inactive until you resend the invitation (Settings > Users > caret menu > Resend Invite) or share the password-creation link with them directly.
Need Additional Help?
We're here to assist you in any way we can. Don't hesitate to reach out to support@betterunite.com
Let's go do some good.