-1.png?width=240&height=100&name=Heading%20(2)-1.png)
Waivers, disclaimers, or other similar documents are articles that can be authored within BetterUnite, and then associated with a particular fundraiser, event, membership or volunteer page in order to be displayed to the donor/participant at the time of their checkout process.
These documents are represented as content that are created, and published within BetterUnite. As such, they are not actual document attachments, but rather, rich text enabled content that is maintained in BetterUnite.
Creating a waiver or a Disclaimer
- To create a waiver or a disclaimer go to settings (by clicking the icon in the top navigational menu).

- Click Documents, this will take you to the Content library.

- Click Add Content button to start creating your document.

- Content Name: This is a unique name or title you can give this particular content that will be referenced throughout the system and fundraisers. This title will also be displayed to the donor/attendee, when they complete their purchase online.
- Content Type: This simply indicates if this document is a Waiver, Disclaimer, or a General content. This has no functional implications, its just a categorization for reference.
- Content Description: This is a description notes about the content, and its only visible internally in your organization, not exposed to the donor/attendee.
- Content: This is the body of the document that will be displayed to the donor or attendees.

- When you are done editing your new content, you can click Save & Publish to make it available to be referenced in fundraisers.
Associating a Waiver or a Disclaimer with a fundraiser
- Go to Giving Pages and select a Giving Page.
- Select the campaign.

- Go to Edit Membership Page.

- Select Manage -> Advanced Options to pull up the Content for Donor or Guests section.

- If you have created and published any documents, you will see a dropdown list showing all available and published content you have in your organization.
- You can select and associate documents from this list

- You can associate multiple contents with your fundraiser and they will all be displayed and associated with each guest / attendee when a purchase is made.
Donor View
You can create custom content in your organization and associate one or more of the content documents with a particular fundraiser or an event. When a guest purchases ticket(s) for that event, they will be shown all associated content for that event. The content will be repeated and associated with each guest in a particular registration. For instance, if someone purchased two tickets, the content will be associated with each guest after purchase.
On the confirmation page, the guest will be able to view each document, as well as sign each document by writing in their full name and clicking the "I Acknowledge" button. The system captures the timestamp and the signature information above, and this can be seen when you access the document for the attendee at anytime in the future.
On the confirmation page, the guest will be able to view each document, as well as sign each document by writing in their full name and clicking the "I Acknowledge" button. The system captures the timestamp and the signature information above, and this can be seen when you access the document for the attendee at anytime in the future.

If you would like to impose that the registrant signs one or more of these associated document(s) before they can complete their purchase, you can do this by setting this option on the Content for Attendees grid on the Edit Event page. On each document you have associated with the event, click the toggle icon to turn on or off the requirement status of the document. Any documents that are marked as required to check out, will be shown on the check out page for that event before the purchaser is able to complete their transaction.
Adding waiver/disclaimer/other documents to an event
After you have confirmed that you have the necessary documents captured in the application, you can add them to your event by following the instructions below:
- Go to the Event Edit page for the event you want to modify.

- Click Manage -> Advanced Options.
- Scroll down to Content for Donors or Guests.

- Note the drop down list of content with the "Add" button next to it. Select the content you would like to add, and click the "Add" button to add it. Repeat for each content document

- After you have added the content, you will note that the grid displays a toggle icon for each row under the "Required" column.
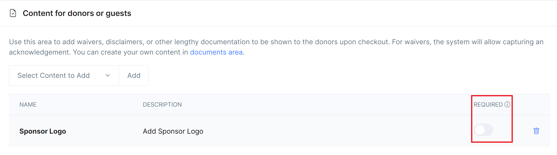
- This option allows you to require registrants to sign or acknowledge content before completing their purchase. If this option is not enabled for a content item, the content will still be displayed after the registrant completes their transaction, but it won't prevent them from completing the transaction. In such cases, participants will still have the opportunity to sign each document.
- You can choose whether to require a contract to be signed before or after payment. However, it's generally advisable not to slow down ticket purchases for your event by adding barriers. Guests will still see the content after they purchase and will have the opportunity to sign it anyway. Ultimately, it's up to you whether to prevent a purchaser from completing their transaction until they have signed any or all of the documents you've added to your event.
Need Additional Help?
We're here to assist you in any way we can. Don't hesitate to reach out to support@betterunite.com
Let's go do some good.