-1.png?width=240&height=100&name=Heading%20(2)-1.png)
For a Video Guide of the below instructions, please visit Introduction to Pages.
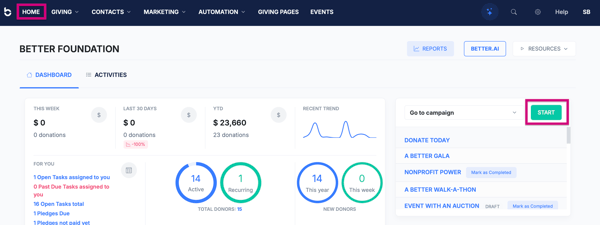
Step 1: Navigate to Giving Pages or to the Start button on your Home dashboard
-
Log in to your BetterUnite account.
-
From the top navigation bar, select Giving Pages.
-
Click Start a Campaign in the upper-right corner.

Or
-
Log in to your BetterUnite account.
-
From the top navigation bar, select Home.
-
Click the green Start button to the mid-right.
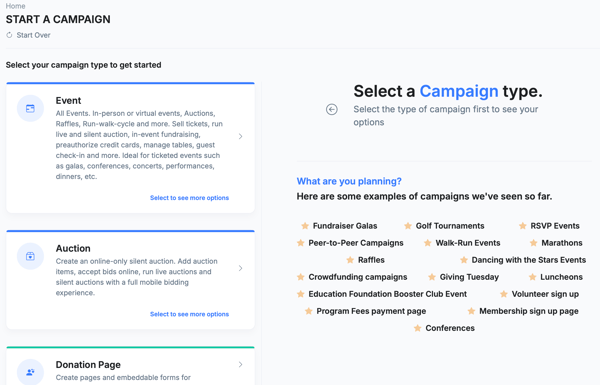
Step 2: Select Donation Page as the Campaign Type
-
On the Start a Campaign screen, scroll through the available campaign types.
-
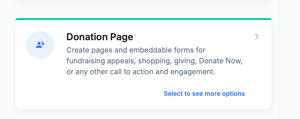
Select Donation Page.
Donation Pages are used for:
-
Fundraising appeals
-
“Donate Now” pages
-
Embedded donation forms
-
General giving and engagement
Select to continue.
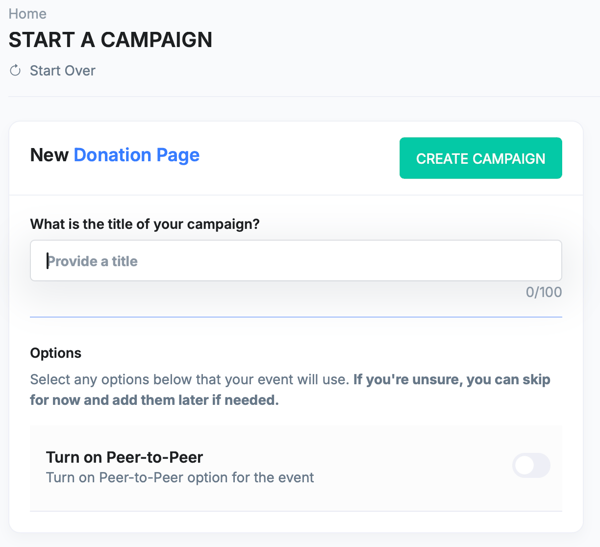
Step 3: Create the Donation Page
On the New Donation Page screen:
-
Enter the campaign title
-
Example: Donate Today
-
-
(Optional) Enable Peer-to-Peer fundraising if supporters will be able create their own fundraising pages.
-
Click Create Campaign.
You’ll be taken into Fundraiser Setup.
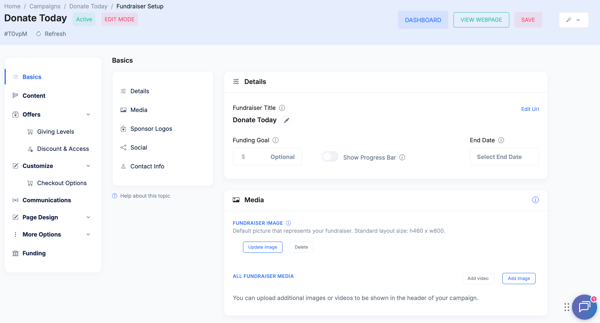
Step 4: Configure Basics
From the left navigation, select Basics.
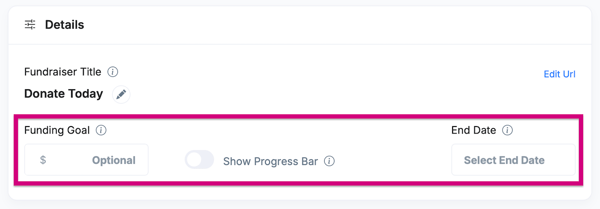
Details
-
Fundraiser Title – Public-facing campaign name
-
Funding Goal (optional)
-
Progress Bar – Toggle on to display progress bar with a goal amount
-
End Date (optional)
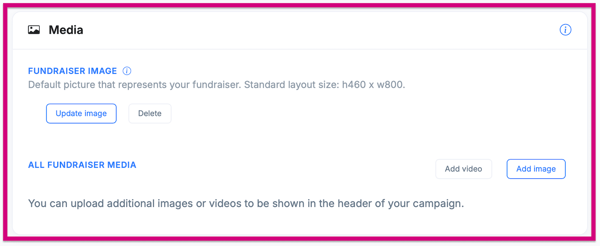
Media
-
Upload a Fundraiser Image (recommended size: 1460 × 800)
-
Add additional images or videos to appear in the header
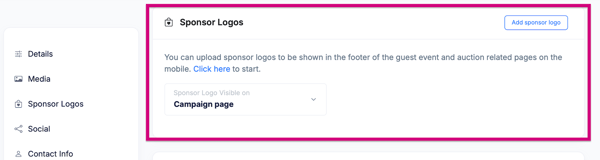
Sponsor Logos (Optional)
-
Upload sponsor logos, png or jpg files are recommended
-
Once sponsor logo is uploaded, you can add the url to the sponsor's website to make it clickable.
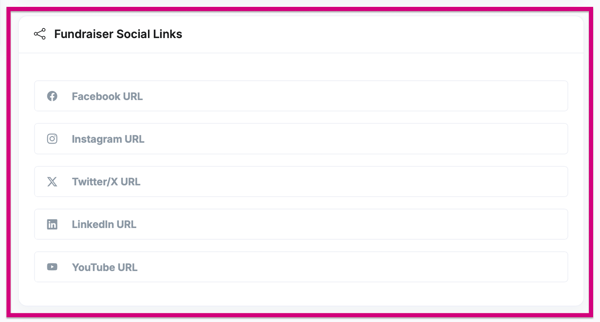
Social Links (Optional)
-
Add links to Facebook, Instagram, X (Twitter), LinkedIn, or YouTube for the specific campaign, otherwise, the links that you have on your profile will show.
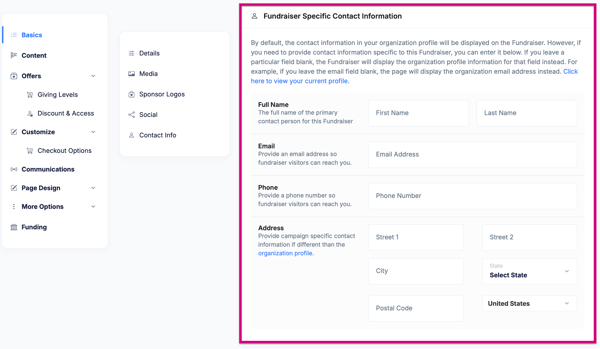
Contact Information
-
Your organization’s default Profile contact info will show
Or
-
Enter fundraiser-specific contact details (name, email, phone, address)
Click Save as you move through the sections.
Step 5: Add Fundraiser Content
-
Navigate to Content in the left menu.
-
Use the rich text editor to add the main fundraiser description.
-
This is the primary content donors will read.
-
You can include images, videos, links, and formatted text.
-
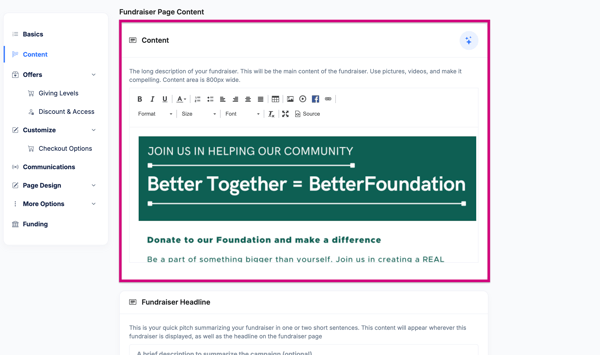
-
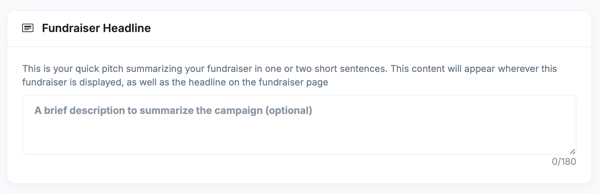
Add a Fundraiser Headline, a short summary shown in listings and previews and on the Main Campaign webpage.
Step 6: Create Giving Levels (Donation Amounts)
This step is optional and is used to provide more information to donors about what their money can help do for your organization.-
Open Offers → Giving Levels.
-
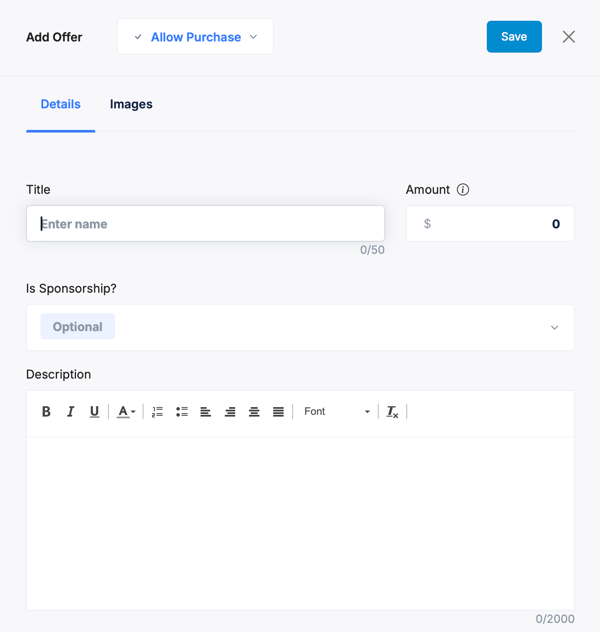
Click Add Offer.
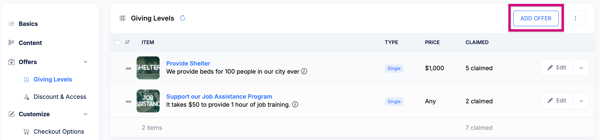
For each giving level:
-
Title (example: Provide Shelter)
- Amount – Dollar value if fixed, if you want to leave the amount blank so donors can give any amount, simply delete the $0 and leave that field blank.
-
Description explaining donor impact with a statement of what that money can do
- Images - You can add an image to accompany each giving level
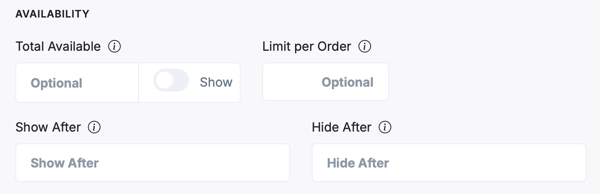
Availability (Not typically used for Donation Levels, but there if needed.)
- Total Available - If you need to limit the number of donation to this giving level.
- Limit Per Order - Limit how many donations can be made to this level in a single transaction.
- Show After/Hide After - Have your giving levels or fund levels show or hide after a certain day or time.
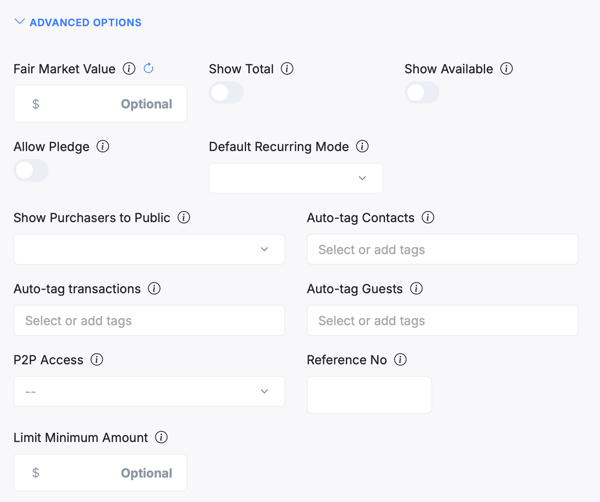
Advanced (Not often used for Donation Levels, but there if needed.)
- Fair Market Value: Provide a Fair Market Value if applicable.
- Show Total: If toggled on, the total number of times donated to this giving level will be displayed on the public Campaign Page.
- Show Available: If toggled on, the total quantity available for purchase will be displayed on the public Campaign Page. Not often used, unless the giving level is a donation of amounts for a certain item. (ie. 20 computers needed at $1000 each)
- Allow Pledge: If toggled on, donors can purchase this item as a pledge.
- Default Recurring Mode: If turned on, upon donation to this giving level, it will make this donation automatically a recurring donation on the checkout page. Donors have the ability to change it back to a one-time donation on the checkout page.
- Show Purchasers to Public: You can publicly show the names of the people who donated to this giving level on the campaign webpage.
- Auto-tag Contacts: Upon donation to this level, the purchaser contact will be tagged with the provided tags within the CRM.
- Auto-tag Payments: Upon purchase of this item, the transaction record will be tagged with the provided tags in the transactions area.
- Auto-Tag Guests: Not applicable. Leave blank.
- P2P Access: You can determine if this item will show on parent or child campaign pages. By default the item will be shown on both pages.
- Reference Number: An optional internal reference number assigned to this ticket type.
- Limit Minimum Amount: Used for donation pages that do giving circles or are having different donors at different levels. This allows you to set the minimum amount that they must give to be a donor at this level.
Giving levels appear as selectable donation options on the page.
Click Save changes when finished.
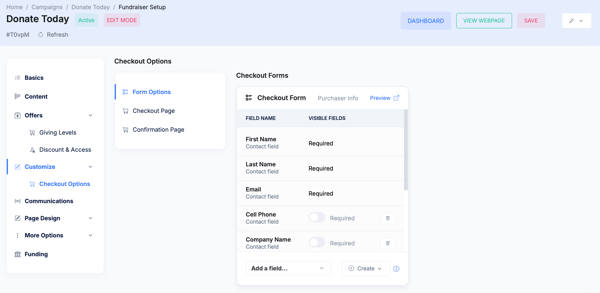
Step 7: Customize Checkout Options - For more detailed information on how to customize and set up your checkout form, see this article.
Navigate to Customize → Checkout Options.
Form Options
-
Control which fields appear on the checkout form.
-
BetterUnite requires donors to provide their First Name, Last Name, and Email Address to complete a credit card transaction.
-
Set fields as Required or optional (e.g., phone number, company name)
-
Create custom fields if needed
- To Preview your checkout page, click Preview
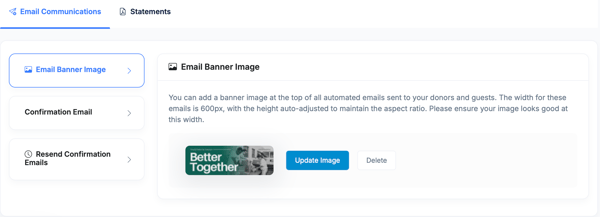
Step 8: Configure Communications
Go to Communications in the left menu.
Email Communications
- Under the Communications tab you can enter in the communications that are automatically sent to your donors. To see what the email will look like, select "View Sample" and it will show a sample of your email with your custom content included.
- Email Banner Image - This will brand the emails for this campaign with an email banner.
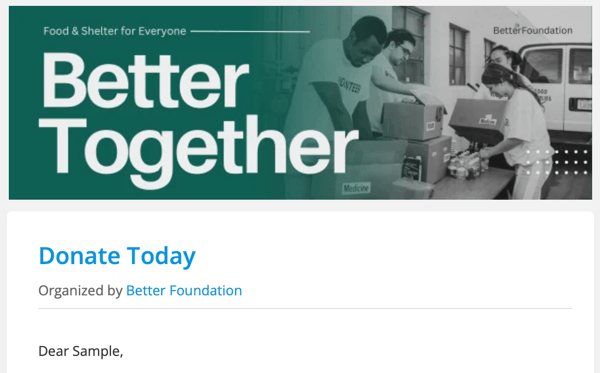
- Confirmation Email - Provide a custom message to your donor when they make a donation. Their receipt will automatically be included in this email. As will the tax deductible language if you have set your EIN and tax deductible status in your organization profile.
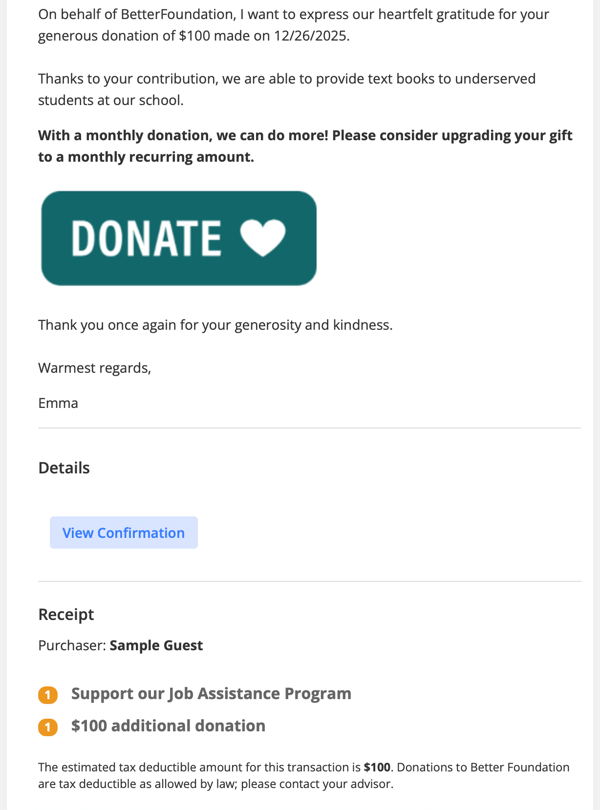
- The confirmation email also gives you the ability to send Conditional Responses to your donors. You can use this function if you'd like to send different communications for different giving levels or donations over a certain amount. These specific responses are appended to the email content that goes out by default as configured above. For more details on this refer to article Conditional Responses.
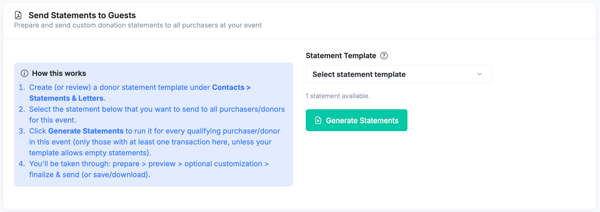
Statements
-
Manage automated statements associated with giving activity to this campaign. For detailed instructions on how to create a statement template to choose for this campaign, please see the Donor Statements article.
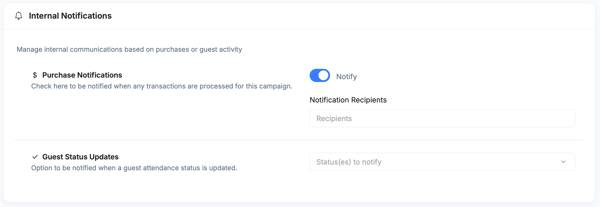
Set Internal Notifications (Optional)
-
Enable Purchase Notifications to alert staff when donations are processed for this campaign. ** Please note that the campaign primary contact will already receive these notifications.**
-
Add up to 5 notification recipients
Step 9: Customize Page Design
Navigate to Page Design to see your campaign webpage and edit the design of it. For detailed instructions and to view where things are, see the Page Design article.
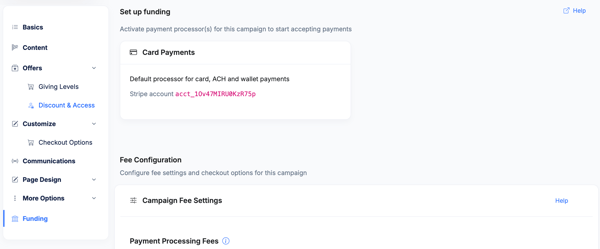
Step 10: Funding
Choose the funding option settings for this donation campaign.
- This is where you choose to pass the fees along to donors or not.
- The original default setting will be set to having your donors opted in to cover all fees, but can choose to opt out on the donation page.
Step 11: Publish and Preview
At the top of the page:
-
Click Save to store changes
- Click Activate when you are ready for your page to be live
![]()
-
Click View Webpage to preview the live donation page
-
Use Dashboard to return to campaign activity and metrics
When marked Active, your donation page is live and ready to accept contributions.
![]()
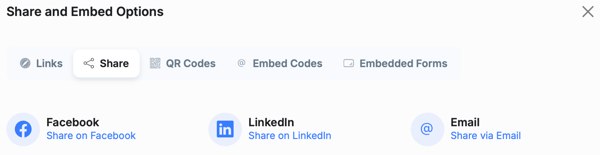
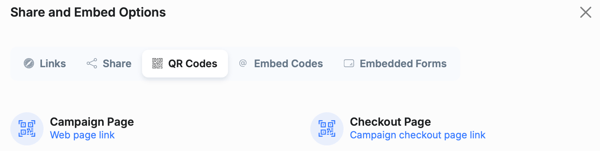
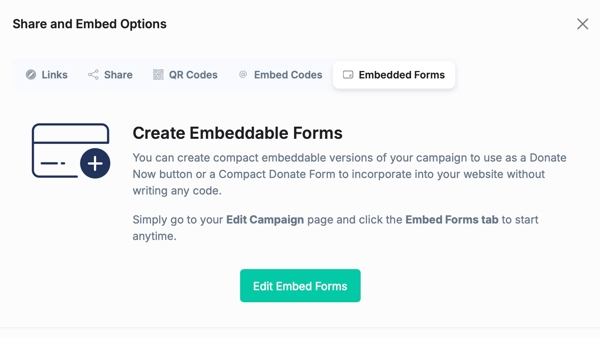
Step 11: Share or Embed Your Donation Page
Navigate to the campaign dashboard by clicking Dashboard, select Links/Embed/QR.

Here you will find:
-
The direct donation campaign page URL and the direct checkout page URL
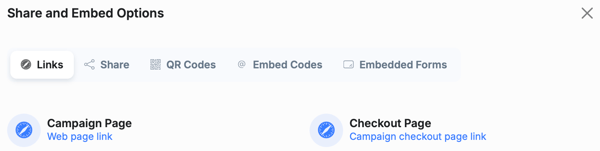
- Direct Share options to SM and Email
-
QR codes for print or digital sharing
- Embed codes to embed this campaign into your existing website
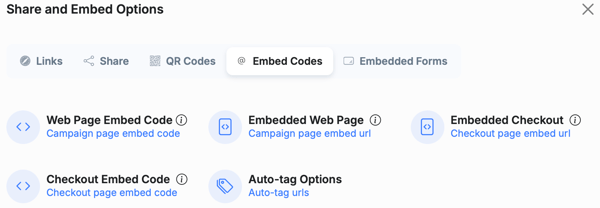
- A quick link to 2 different embed form options for this campaign. To learn more about these quick donation embed forms, check out the Embed Forms and Buttons article.
Best Practices
-
Use compelling images and clear impact messaging
-
Offer multiple giving levels
-
Customize confirmation emails to reinforce gratitude
-
Preview both desktop and mobile layouts
-
Test the donation flow before sharing publicly.
Need Additional Help?
We're here to assist you in any way we can. Don't hesitate to reach out to support@betterunite.com
Let's go do some good