-1.png?width=240&height=100&name=Heading%20(2)-1.png)
To open it, go to Edit Campaign and choose Customize → Checkout Options in the left menu. The tab is split into three parts, and a jump menu on the left takes you to each:
- Form Options — the checkout form, plus the guest or volunteer form for events and volunteer sign-ups.
- Checkout Page — giving options, payment options, layout and branding.
- Confirmation Page — what happens after checkout.
Not every setting appears on every campaign. Each section below notes where a setting is limited to certain campaign types, and the table near the end summarizes it. Click Save Changes after making edits (Checkout Branding saves as soon as you pick a brand kit).
Checkout Form (purchaser information)
The Checkout Form card lists the fields the person paying or doing the initial registration fills in. Click Preview on the card to open your live checkout page in a new tab.
Field rules
- First Name, Last Name and Email are always on the form and always required. They can't be removed.
- Every other field has a Required switch and a remove (trash) icon. Switch Required off and the field is shown as optional.
- Communication preference fields (email marketing, email, phone, mail and SMS opt-ins) are always optional and show "Always optional" instead of a Required switch. A box the donor leaves unchecked is recorded as a decline and updates their contact record, so add these only if you want to ask the question.
- Fundraiser team selection is available on peer-to-peer campaigns. It lets the donor choose which fundraiser or team the purchase counts toward using the "Apply to a Fundraiser" field that will appear when P2P is activated for a campaign.
Adding fields
Use the Add a field dropdown to pick from your existing contact and checkout fields; fields already on the form are greyed out. To make a new one, click Create and choose:
- Create a new Checkout field — stored on the transaction within that campaign.
- Create a new Contact field — stored on the donor's contact record.
Creating custom fields depends on your plan. See Custom Fields Explained.
**Once the field is created, it will then appear in the Add a Field dropdown for you to add to the form.
Form Designer
Scroll down to utilize the Form Designer which is a drag and drop checkout form builder. See Checkout Options: Form Designer for instructions and screenshots
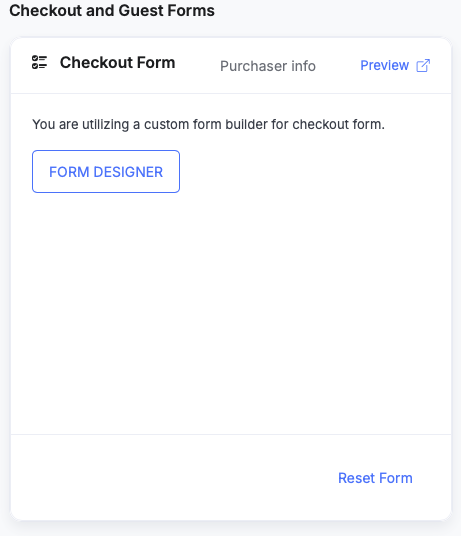
Once a custom layout has been built in the Form Designer, this card shows "You are utilizing a custom form builder for checkout form" with a FORM DESIGNER button instead of the field list. Click Reset Form to discard the custom layout and return to the simple field list.
Guest or Volunteer Information form (events and volunteer sign-ups)
Events show a Guest Information card and volunteer sign-up pages show a Volunteer Information card. It sets the fields collected for each guest or volunteer, separate from the person paying. This is the information you are wanting to collect from each attendee.
Example: The Purchaser buys a table, the guest information is what they need to fill in for each person sitting at their table and using one of the tickets.
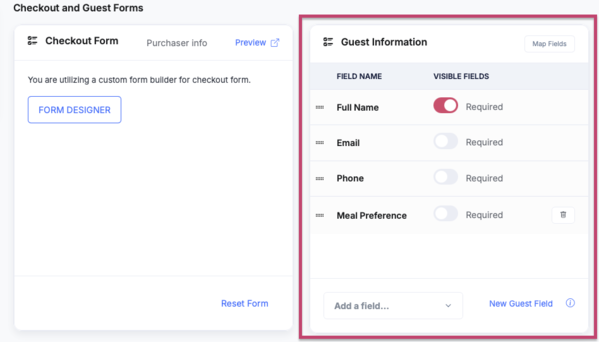
- Name, Email and Phone stay on the form, but you can still switch each one between required and optional.
- Other fields have a Required switch and a remove icon.
- Drag the handle on the left of a row to reorder the fields.
- Add fields from the Add a field dropdown, or click New Guest Field (or New Volunteer Field) to create a custom one.
Map Fields
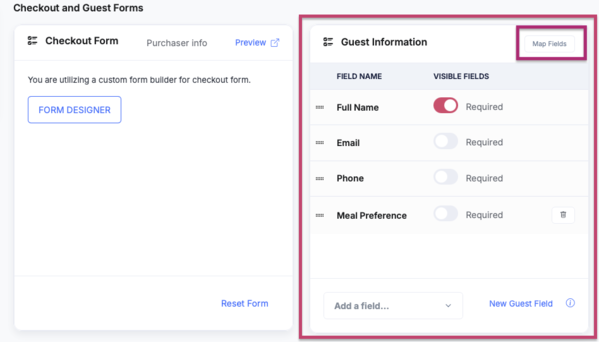
Click Map Fields to copy answers from the checkout form into the first guest's record, so a purchaser buying one ticket doesn't type the same thing twice. For each checkout field, choose the guest field it should fill.
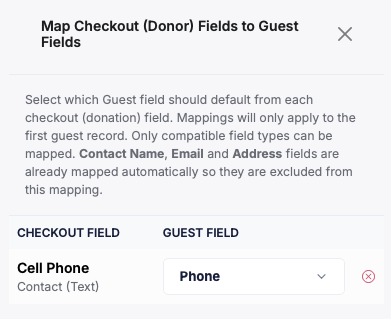

- Mapping applies to the first guest record only. (in other words, the purchaser doesn't have to enter their information twice onto their ticket)
- Only fields of the same type can be mapped (text to text, date to date, and so on).
- Name, Email and Address already copy across automatically and aren't listed.
- Use the clear icon on a row or Clear All, then Save Mapping.
Checkout Page: form layout and donation amounts
Show Donation Buttons (all campaign types except membership sign-ups)
Turn Show on to display donation buttons on the campaign page, then choose how they look:
- Display a single donation button without amount — one Donate button.
- Display suggested donation amounts — up to four amounts (Amount 1–4) plus an Other button. A preview under the fields shows how the buttons will appear. Leave all four blank or 0 to use the default amounts.
Show Add Donation Box (all campaign types except membership sign-ups)
Turn Allow on to let people enter any custom donation amount on the checkout page. If you turn it off, the campaign only accepts payments through its tickets, offers or giving levels, or through a donation button on the campaign page (when those buttons are showing).
Recurring giving (Donation Pages and Giving Pages)
These three settings appear only on Donation Pages and Giving Pages.
|
Setting |
What it does |
|---|---|
|
Allow Recurring Payments |
Lets donors choose a recurring gift. You can also link straight to the recurring option with |
|
Recurring Only |
Makes recurring the only way to give; the one-time option is removed. Appears only when Allow Recurring Payments is on. While it is on, a |
|
Make Recurring Default |
Pre-selects the recurring option for donors. Hidden when Recurring Only is on, since there is no one-time option to default from. To link to the one-time option instead, use |
Form behavior and checkout page message
Conditional Checkout
Click CONDITIONAL CHECKOUT to set rules that show, hide, require or make optional certain checkout fields based on the ticket, offer or giving level chosen. Depends on your plan. See Conditional Checkout: Checkout Form Rules.
Address verification on checkout form
Applies when the checkout form includes the address fields (street, city, state and zip). Options:
- No verification (default)
- Suggest correct address — offers a corrected address the donor can accept.
- Enforce correct address — requires a verified address.
If a notice says the USPS service is temporarily unavailable, verification is paused platform-wide. You can leave your setting as is; it resumes automatically. See Address Verification.
Default Donor Type
Applies when the checkout form includes the Company Name field. Choose whether a new checkout defaults to Individual or Company.
Checkout page content
A message of up to 4,000 characters shown before payment. On donation, giving and event pages it appears below the checkout form while the donor picks an amount. On membership pages it shows while the member picks an offer, and on volunteer pages while they fill in the sign-up page. Events can insert the Total Remaining Tickets merge text. Click View Sample to see where it appears.
Other ways to pay, and limits
Allow Public Pledge (all campaign types)
Lets people complete a purchase or donation without paying now. The transaction is recorded as a pledge in the campaign, and you collect payment offline later.
Allow Stock Donations, DAF & Crypto Payments (not on membership sign-ups)
Lets donors give stock, pay from a Donor Advised Fund, or pay in cryptocurrency through DonateStock. These gifts are captured in DonateStock and paid out to you by DonateStock. If your organization hasn't opted in yet, the setting shows an Opt-In to Accept Stock Donations, DAF & Crypto Payments link instead of a switch. See DonateStock Connection.
Allow Donor Advised Fund Payments (not on membership sign-ups)
Lets donors pay directly from their DAF. It is set up once at the organization level and then turned on per campaign. Until it is set up, you see an Opt-In to Accept Donor Advised Fund Payments link instead of a switch.
Maximum Donation Limit (not on membership sign-ups)
Caps the amount of a single donation. Leave it blank or 0 for no limit.
Page layout, branding and section order
Checkout Page Layout
- Auto (default) — the page decides its steps from the campaign type and the giving options available.
- Show all components at once — everything appears on one page (All offers and the checkout form fields.)
Checkout Branding
Pick one of your organization's brand kits to style this campaign's checkout page. It changes the button colors and the heading and body fonts; backgrounds, text colors and the payment form keep the standard styling. Choose BetterUnite default to remove it. The choice saves as soon as you pick it; use Preview checkout to check. If the list is empty, create a brand kit under Organization Settings → Brand Kits first.
Checkout Section Ordering
Drag the sections to set the order they appear on the checkout page: Tickets, Sponsorships, Event Items / Items for Sale, Raffle, Fund-a-Need / Giving Levels, and Pledge Per-Unit where used. A section only appears if it has items in it. The default order is Tickets, Sponsorships, Items for Sale, Raffle, Fund-a-Need levels.
Show Offers Before Checkout Form
By default if showing all components at once the contact form comes first and the offers (tickets, items for sale and so on) appear below it. Turn on Offers First so people pick their items before filling in their details, but still all on one page.
Collect Guest Information Before Checkout
Turn on Require to collect guest details during checkout, before payment, instead of on the confirmation page afterward. It uses the same guest fields and required-field rules set in the Guest Information card.
Confirmation Page (after checkout)
Guest and volunteer settings (events and volunteer sign-ups only)
|
Setting |
What it does |
|---|---|
|
Pre-Auth On Check Out |
Lets participants pre-authorize a card after buying tickets, usually so in-person check-in is faster. |
|
Show Guest Info |
Offers ticket purchasers a place to enter guest details on the confirmation page and in their confirmation email. |
|
Lock Guest Info |
Blocks purchasers and guests from changing guest details. |
|
Allow Status Updates By Guest |
Lets purchasers and guests update their own status, for example their RSVP or Not Attending. |
|
Guest Address Verification |
Same choices as checkout address verification, applied to address fields on the guest form. |
On volunteer sign-up pages these read "Volunteer" instead of "Guest".
Confirmation page content (all campaign types)
A message of up to 4,000 characters shown after a purchase is completed. On events it appears after any purchase, not just ticket purchases. Use it for next steps or follow-up instructions. Click View Sample to see where it appears.
Confirmation page options (all campaign types except membership sign-ups)
|
Switch |
Controls |
|---|---|
|
Show Print Tickets option on the confirmation page |
The Print Tickets button on the page shown right after checkout. Does not change the confirmation email. |
|
Show Apple Wallet option on confirmation |
The Add to Apple Wallet button. |
|
Show Share option on confirmation |
The Share button. |
|
Show "Leave a Public Note" option |
The prompt to leave a public note. |
|
Show Print Tickets link in the confirmation email, and the image on printed tickets |
One switch for both: the Print Tickets link in the purchase confirmation email and the banner image on the printable ticket page. |
|
Print the guest's name on their ticket |
Off by default. When on, each printed ticket shows the named guest; tickets with no guest name print without one. |
Which settings appear on which campaign type
Settings not listed here appear on every campaign type.
|
Setting |
Donation Page |
Giving Page |
Event |
Membership |
Volunteer |
|---|---|---|---|---|---|
|
Guest / Volunteer Information form, Map Fields |
— |
— |
Yes |
— |
Yes |
|
Show Donation Buttons, Add Donation Box |
Yes |
Yes |
Yes |
— |
Yes |
|
Allow Recurring, Recurring Only, Make Recurring Default |
Yes |
Yes |
— |
— |
— |
|
Stock/DAF/Crypto, DAF payments, Maximum Donation Limit |
Yes |
Yes |
Yes |
— |
Yes |
|
Pre-Auth, Show/Lock Guest Info, Status Updates, Guest Address Verification |
— |
— |
Yes |
— |
Yes |
|
Confirmation page options (print, wallet, share, note, ticket name) |
Yes |
Yes |
Yes |
— |
Yes |
Related articles:
Need Additional Help?
We're here to assist you in any way we can. Don't hesitate to reach out to support@betterunite.com
Let's go do some good.