Salesforce connection setup
Connect to your Salesforce account to sync donors and donations, guests and volunteers
We recognize that many nonprofit organizations have utilized Salesforce's CRM offering for NPOs and some would like to continue to do so or your organization has customized a Salesforce account to your needs and you would simply like to use the BetterUnite fundraising tools as an overlay to your Salesforce CRM. This one-way integration will take any donor data collected as you sell tickets or get donations through campaigns within BetterUnite and export it to Salesforce.
Below you will find the steps to setup your Salesforce connection. Once you setup your connection, you can sync your donors and donations. Click here to find out how the functionality works after you setup your connection.
How to setup your connection
When we have an external application that needs to authenticate with Salesforce, you need to define it as a connected app in Salesforce.


- Enter the name of this application. e.g. BetterUnite, and set the contact email information e.g. support@betterunite.com.

- Select Enable OAuth Settings.
- Enter a Callback URL as follows (case sensitive): https://www.betterunite.com/registersfresponse.
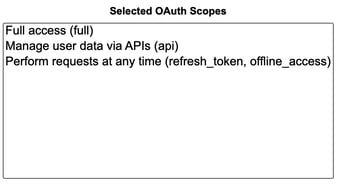
- Add OAuth scopes to Selected OAuth Scopes. We recommend adding "Full Access (full)" and API based scopes listed below in the screenshot . These scopes provide the permissions necessary for transmissions between BetterUnite & Salesforce.

Note: additional scopes have become necessary with the integrations, please add below as well.

![]()
- Click Save to add the new connected app.
- Click Manage Consumer Details and copy both the Consumer Key and Consumer Secret.


- Click Manage, and Click Edit Policies button, locate the Client Credentials Flow section, and set a valid user in the Run As field and click Save.

- Your connected app is ready to run once you save the connection details on this page.
- Grab your Salesforce domain name. Easiest way to do this may be to click on your user icon on the top right corner of your Salesforce page. Example below:

In the above example, the domain name would be "betterunite2".
Note: Another way to do this may be simply looking at the url after you're logged into your Salesforce account and grabbing the first part of the url after the https://. e.g. if your url goes something like this "https://mydomainnamexyz.lightning.force.com", then your domain name is "mydomainnamexyz". - Now copy and paste the values from the previous steps and your domain name into the corresponding fields on the setup page and save connection. You should now be good to go!

Option: Enabling Tags / Topics sync feature
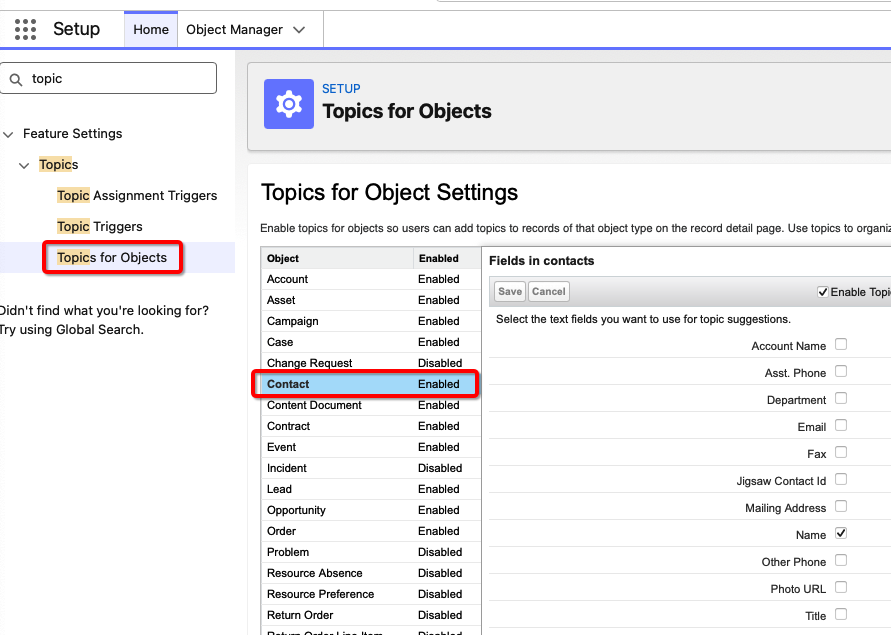
In order to sync contact tags with Salesforce, you can turn on the "Topics" for the contact entity in your Salesforce platform. To enable the feature, go to setup -> topics for objects -> make sure topics are enabled for "contact" entity.

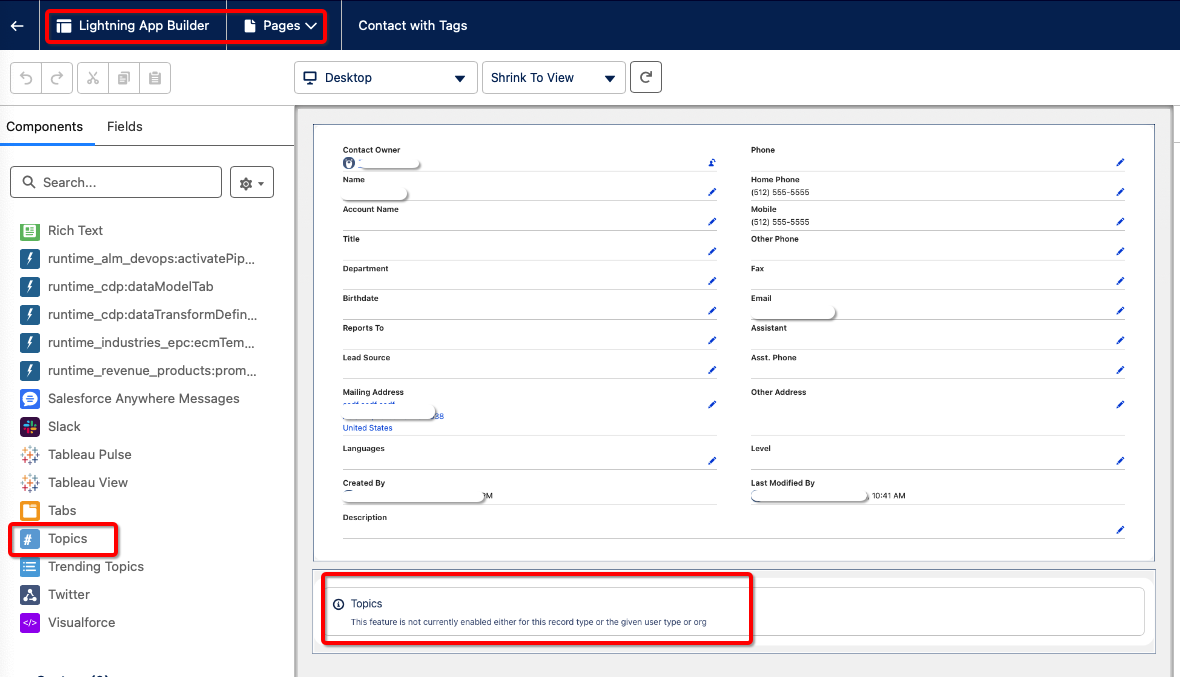
You may also modify your contact page to display the "topics" associated with the contact for easy access. Example page editor shown below:

-1.png?width=240&height=100&name=Heading%20(2)-1.png)