Profile Set Up
Learn how to set up your organization's Profile.
In this article we'll guide you through setting up your organization's profile. This is a crucial step to ensure that all of your campaigns are branded and aligned with your organizations identity. Scroll down for step-by-step instructions or view the short tutorial video below.
How to set up and complete your Profile.
- First navigate to your settings by clicking on the gear icon in the top right corner.

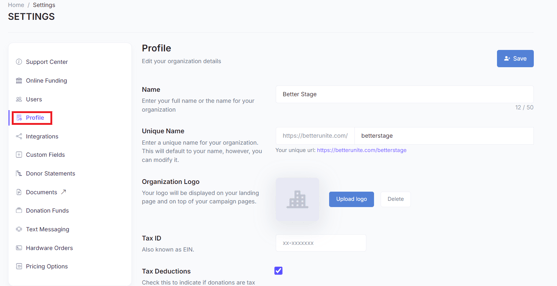
- On your settings page select profile.

- Confirm or edit your organization's name and BetterUnite URL.

- Then proceed to upload the organizations logo. This logo will appear on all campaigns created within your account, helping to maintain consistent branding.

- Enter in your organizations Tax ID number.
- If your donations are tax deductible, make sure to check the appropriate box. This will automatically include tax deductible language in all donation receipts.

- Set your default time zone to ensure that all time sensitive activities are accurately scheduled and displayed.

- Include any social media links, tags, or analytics that you need.
- This will help integrate your campaigns with your broader digital presence and track their performance.

- The contact details initially displayed will be that of the person designated as the main contact.
- However, this information will be visible on the public facing page of every campaign. If you prefer not to display this person's contact details, consider adding general contact information instead.

- Finally, don't forget to save your profile settings.

Need Additional Help?
We're here to assist you in any way we can. Don't hesitate to reach out to support@betterunite.com
Let's go do some good.
-1.png?width=240&height=100&name=Heading%20(2)-1.png)