-1.png?width=240&height=100&name=Heading%20(2)-1.png)
Ticket waitlisting lets guests join a queue for sold-out ticket types. When a spot opens up, you can either offer it automatically to the next person in line or manually select who receives the offer. Waitlisting is available on Premiere and Event Premiere plans.
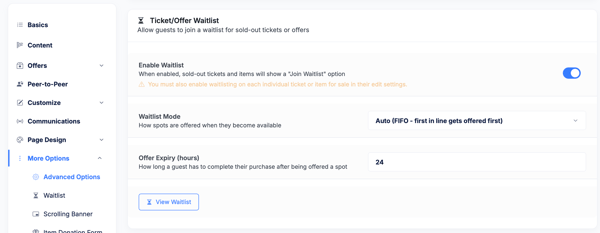
Step 1 — Enable Waitlisting on the Event
- Navigate to your event and open Edit Event.
- Go to the More Options>Advanced Options section.
- Scroll down and toggle on Waitlist to enable the waitlist feature for the event.
Please note: Enabling waitlisting at the event level makes the feature available, but you also need to enable it on each individual ticket type where you want to allow it.
Step 2 — Enable Waitlisting on Individual Ticket Types
- Go to the Tickets tab within Edit Event.
- Edit the ticket type you want to allow waitlisting on.
- Toggle on Allow Waitlist for that ticket type.
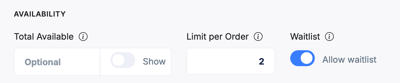
- Repeat for any other ticket types where waitlisting should be available.
Only ticket types with "Allow Waitlist" enabled will show the Join Waitlist button to guests when sold out. Ticket types without this setting will simply show as sold out with no waitlist option.
The Guest Experience: Joining the Waitlist
- When a ticket type is sold out and waitlisting is enabled, guests visiting your event page will see a Join Waitlist button in place of the regular purchase button.
- The guest clicks Join Waitlist, selects the quantity they want, and enters their contact details.
- After submitting, the guest receives a confirmation email and optionally a text message (if they provided a phone number) letting them know they have been added to the waitlist.
The organizer also receives a notification when a guest joins the waitlist, showing the guest's name and the number of tickets requested.
Managing the Waitlist as an Admin
- To view your waitlist, navigate to your event's Event Dashboard.
- Find the Waitlist section, which shows all guests currently waiting, along with the date they joined, their name, and the number of tickets requested.
- For each guest, you have two options: Send Offer or Remove.
Offering a Spot to a Guest
- Click Send Offer next to a guest's name to offer them the available spot.
- Set how long the offer remains valid before it expires. The default is 24 hours — after that window, the spot is released back to the waitlist.
- Click to send the offer. The guest immediately receives an email with a unique reservation link.
Automatic vs. Manual Offers
- Automatic (first-in, first-out): If configured, BetterUnite automatically sends an offer to the next person in line when a spot opens. This is useful for high-volume events where you don't want to manually manage the queue.
- Manual: You review the waitlist and choose which guest to offer the spot to. This gives you more control over who receives the offer.
Your waitlist mode is configured in the event settings when you enable the waitlist.
The Guest Experience: Claiming a Reserved Spot
- When you send an offer, the guest receives an email with a reserved spot link. The email includes the offer expiration time so the guest knows how long they have to complete the purchase.
- The guest clicks the link, which takes them to the event page. The reserved ticket is automatically selected and marked as held for them.
- The guest completes checkout as normal. Even though the ticket type shows as sold out to other visitors, the guest with the reservation link can still purchase.
- If the guest does not complete the purchase within the offer window, the reservation expires and the spot is released back to the waitlist for the next offer to be sent.
Frequently Asked Questions
Which plans include ticket waitlisting?
Waitlisting is available on Premiere and Event Premiere plans. If you don't see the waitlist option in your event settings, your current plan may not include this feature. Contact your account manager to learn about upgrading.
Can a guest join the waitlist for multiple ticket types?
Yes. A guest can join the waitlist for any sold-out ticket type that has "Allow Waitlist" enabled. Each ticket type has its own independent waitlist.
What happens if a guest ignores the offer email?
The offer expires after the configured window (default 24 hours). The spot is automatically released and you can send an offer to the next person on the waitlist.
Can I remove someone from the waitlist?
Yes. Click Remove next to a guest's name in the waitlist view to remove them. They will not receive a notification unless you choose to send one.
Does joining the waitlist require payment?
No. Joining the waitlist is free and does not require the guest to enter payment information. Payment is only collected when they follow the reservation link and complete checkout.
Will guests receive a text message notification?
Text message notifications are sent to guests who provided a phone number when joining the waitlist, provided your organization has SMS messaging set up. See Send SMS / Text Messages to Guests for more information.
Can I see which ticket type each waitlisted guest requested?
Yes. The admin waitlist view shows the ticket type, quantity requested, and the date the guest joined the waitlist for each entry.
Need Additional Help?
We’re here to assist you in any way we can. Don’t hesitate to reach out to support@betterunite.com
Let’s go do some good.