-1.png?width=240&height=100&name=Heading%20(2)-1.png)
The Store feature in the BetterUnite mobile app gives your check-in team a built-in point of sale (POS) for collecting immediate payments on the spot — no pre-registration required. Whether a walk-up guest wants to buy a ticket at the door, purchase raffle tickets, or donate at a giving level, your staff can handle it all from a phone or tablet in seconds.
What Is the Store?
The Store is a tab inside the BetterUnite mobile app (labeled Store in the bottom navigation bar) that surfaces a curated list of purchasable items from your active campaigns. Unlike the Guest Carts view — which manages items already assigned to registered attendees — the Store is designed for new or unregistered buyers who are paying right now, in person.
The Store supports the following item types from your campaigns:
- Tickets — event admission tickets
- Raffle Tickets — raffle ticket packages configured in a Raffle campaign
- Items for Sale — physical or experiential items set up as Items for Sale
- Fund-a-Need / Giving Levels — fixed donation amounts from giving level or Fund-a-Need offers
Each item must be individually enabled for the Store in its campaign settings before it will appear here.
Step 1 — Enable Items for the Store in Campaign Setup
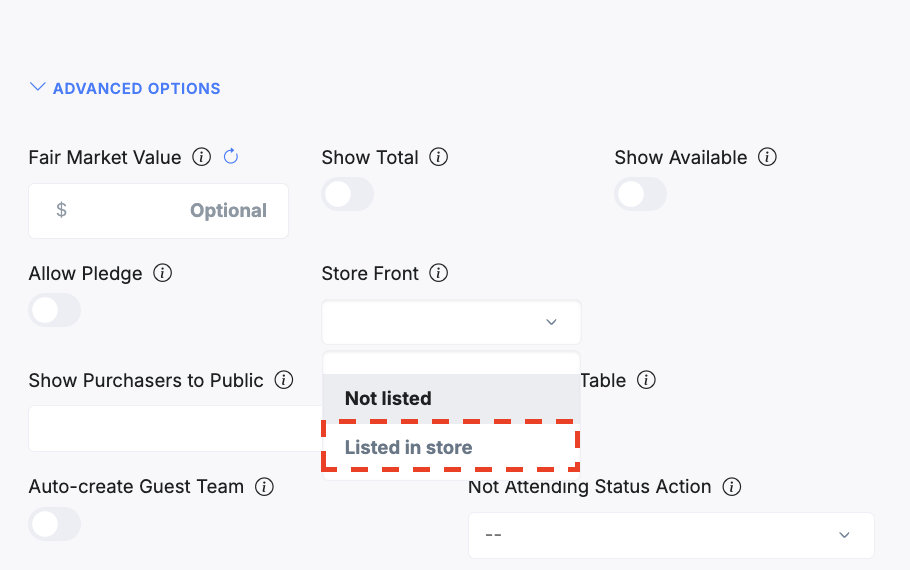
Items do not appear in the Store by default. An admin must set the Store Front option to Listed in store on each item you want available for walk-up purchase.
List item in store
In the ticket settings, expand Advanced Options for the ticket type and change the Store Front dropdown from Not listed to Listed in store.
Note, the Store Front attribute will be available on all offers so look for the corresponding option in edit offer for each type you want to list in the store.
Step 2 — Open the Store in the App
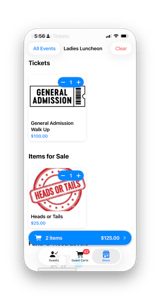
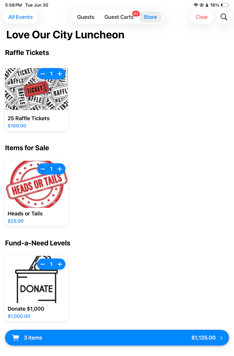
Open the BetterUnite app and tap the Store tab in the bottom navigation bar. If you manage multiple events, tap All Events at the top to filter items by a specific event. The store will display all items marked Listed in store, grouped by category (Tickets, Raffle Tickets, Items for Sale, Fund-a-Need Levels).
On an iPad, the same Store view shows a larger card layout with all item categories visible at once.
Step 3 — Add Items to the Cart
Tap the + button on any item card to add it to the cart. The quantity badge on the card updates immediately. Use the – and + controls to adjust quantities directly on the Store screen.
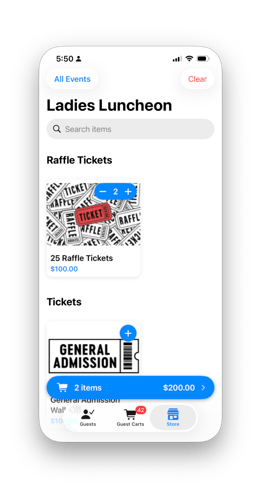
You can add multiple different items to the same cart in a single transaction. The blue cart bar at the bottom shows a running item count and total. Tap it to open the Cart and review before checkout.
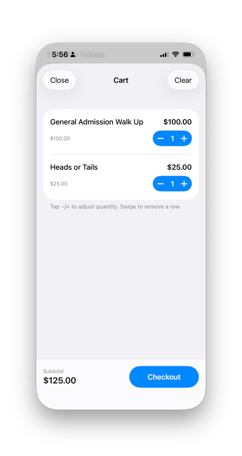
Step 4 — Review the Cart
The Cart screen shows each line item, its unit price, and quantity. Tap – or + to adjust quantities here as well. To remove an item entirely, swipe the row to the left. Tap Checkout when ready to proceed.

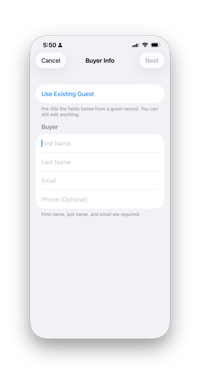
Step 5 — Enter Buyer Information
After tapping Checkout, you'll reach the Buyer Info screen. You have two options:
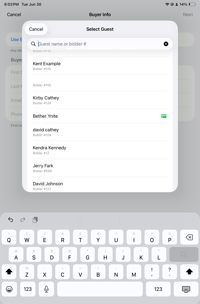
Option A — Use an Existing Guest
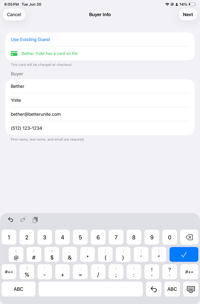
Tap Use Existing Guest to search your event's guest list by name or bidder number. This pre-fills the buyer fields automatically. If the guest already has a card saved on file (indicated by a green card icon), the app will use that card at checkout — no manual card entry needed.
When a guest with a card on file is selected, the Buyer Info screen confirms the card will be used at checkout.
Option B — Enter a New Buyer
For walk-up guests not in the system, manually enter their First Name, Last Name, and Email (required). Phone is optional. Tap Next to proceed to payment.
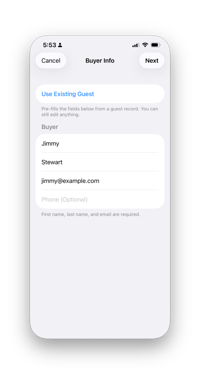
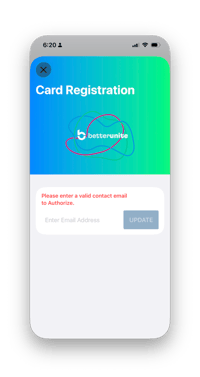
Important: A valid email address is required to authorize a card for a new buyer. The receipt will be sent to this address after payment.
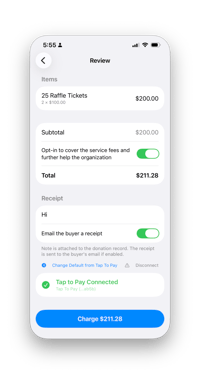
Step 6 — Review and Charge
The Review screen shows the full order summary including item(s), subtotal, and total. From here you can:
- Toggle Opt-in to cover service fees to let the buyer cover processing costs
- Add an optional Note that will be attached to the donation record
- Toggle Email the buyer a receipt on or off
- Select or confirm the payment method (Tap to Pay, manually entered card, or card on file)
When everything looks correct, tap Charge $X.XX to process the payment.
Step 7 — Collect Payment
For guests with a card on file
If the buyer was matched to an existing guest with a saved card, payment is charged automatically when you tap Charge. No additional card entry is needed.
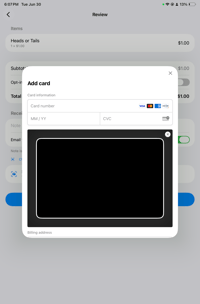
For new buyers — Add a Card
If no card is on file, a modal will prompt you to enter card details manually (number, expiry, CVC) or scan the card using the device camera.
Tap to Pay
If your device and Stripe account support Tap to Pay, the Review screen will show a "Tap to Pay Connected" indicator. Simply tap Charge and present the physical card or Apple/Google Pay device to the back of the iPhone to complete the transaction without a card reader.
Step 8 — Payment Confirmed
Once payment succeeds, the Payment Received screen confirms the amount and itemized receipt. The buyer automatically receives a receipt by email. You can also tap Share Receipt to send or display the receipt immediately via the device's share sheet.
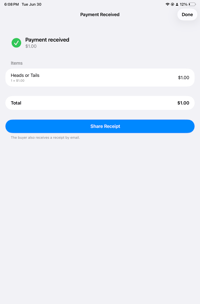
Tap Done to return to the Store and begin the next transaction.
Clearing the Cart
To discard all items in the current cart without completing a purchase, tap the Clear button at the top right of the Store screen. A confirmation prompt will appear — tap Clear again to confirm. Note that this action cannot be undone.
![]()
Tips & Best Practices
- Set up Store items before the event. The Store Front → Listed in store toggle must be configured in the web admin ahead of time. It cannot be changed from within the app.
- Use an iPad for busy check-in tables. The larger display shows more items at once and is easier for the operator to navigate quickly.
- Tap to Pay speeds up the line. If your iPhone supports Tap to Pay, enabling it in your Stripe dashboard eliminates the need for a separate card reader.
- Existing guest records are linked automatically. When you use an existing guest to complete a Store purchase, the transaction is recorded against their guest record, keeping your donor history complete.
- New buyers are created as contacts. Walk-up buyers who don't exist in the system are added as new contacts after checkout, with the transaction attached to their record.
- Fee coverage is optional per transaction. The service fee opt-in toggle on the Review screen lets each buyer decide individually — it's not an all-or-nothing event setting.