-1.png?width=240&height=100&name=Heading%20(2)-1.png)
- When setting up your Edit Event>Checkout Options there is an area to set up what information you are collecting from each guest. See the Guest Information article for more details.
- Once they submit their purchase, they will be redirected to a confirmation page. They can either click on "Edit Guest" to enter the details themselves or click on "Ticket" to email individual tickets to their guests for them to fill out. The first ticket will always have their purchaser's information on it, but it can be changed on this screen as well.
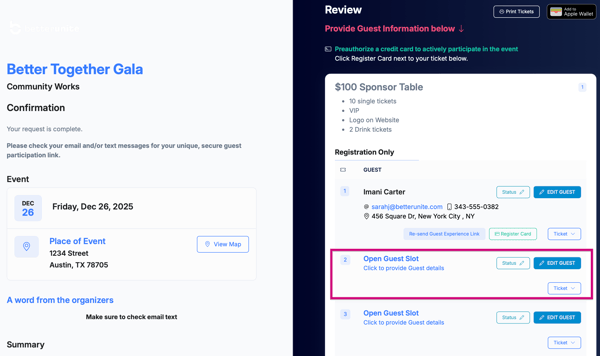


- They also receive an email with a link to this page so that they can update it anytime.

- We recognize that registrants may not know all of their guests immediately, so they are able to access this confirmation page anytime, and update their guest list information when ready.
- One way that BetterUnite can help you collect more guest details from more of your attendees is to send out the Guest Info Request email. Go to Edit Event>Communications>Guest Info Request or Dashboard>Communications>Email Communications>Guest Info Request

- This email only goes to those purchasers of tickets that have not filled in all their guest names. You can schedule as many of these to go out as you need. That email is shown below. You can customize the message each scheduled email.

- If purchasers give you their guest information, you can input it for them several ways.
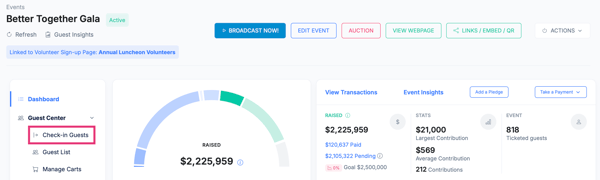
- From with Check-In by going to Dashboard>Check-In Guests
-
- Search the purchaser's name, click on their name under Purchases.

-
- Select an Open Guest Slot.
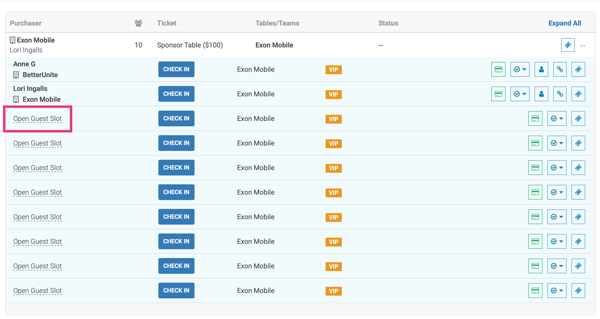
-
- Input the first guest's details into the fields. Select New Contact if they are not in your system yet and enter their details or select the person from your existing contacts within your BetterUnite CRM.


- You can also enter their guest names into their tables within Dashboard>Table Management.

-
- Search for the Purchaser Name in the search field.

-
- Expand the table to show all the guest slots.


-
- Begin entering the guest name and add a new contact exactly as shown above or select the person from your existing contacts within your BetterUnite CRM.


- If none of these things happen, and typically registrants don’t always provide guest information before the event, you will enter them when they show up to your event. Using the Check-In Guest route in real time as shown above.
Need Additional Help?
We're here to assist you in any way we can. Don't hesitate to reach out to support@betterunite.com
Let's go do some good.