
This article walks you through creating the page, filling in the basics, and sharing it. When you're ready to add the jobs and shifts volunteers will choose from, see Creating Jobs and Shifts on a Volunteer Sign-Up Page.
Step 1: Start a new sign-up page
- Open Volunteers from the main menu (listed as Contacts → Volunteers & Sign Up Pages in some menus).
- Click Create a Sign-up Page.
- The Volunteer Sign Up Page type is already selected for you.
- Enter a Page title and create the page. Pick something volunteers will recognize, like "Spring Park Cleanup" or "Saturday Food Pantry Helpers."

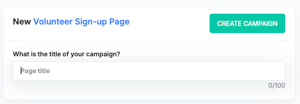
You'll land on the page's Edit screen, where you set up everything else. You can change the title later by clicking the pencil icon next to it.
Step 2: Fill in the basics
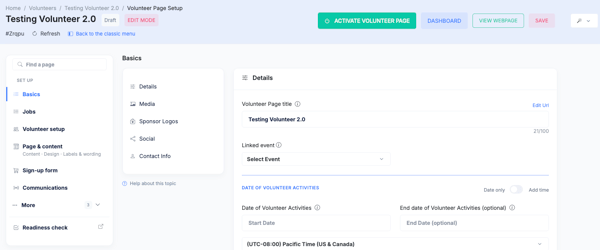
- Linked event (optional). If this sign-up page supports an event you've already created, choose it from the Linked event list. The volunteer sign-up information then shows on the event page. Leave it blank for a stand-alone volunteer page.
- Date of Volunteer Activities. Enter the date volunteers will be helping. Use the Date only / Add time switch if you want to include a start time. You can also add an End date (optional) if the activity runs over several days or has an end time. If you plan to offer several dates or time slots, you can add these as shifts instead (see the next step).
- Time zone. Choose the time zone for your activity so dates and times show correctly to volunteers.
- Location. Click Search Location to add where volunteers should go.
Step 3: Add jobs and shifts
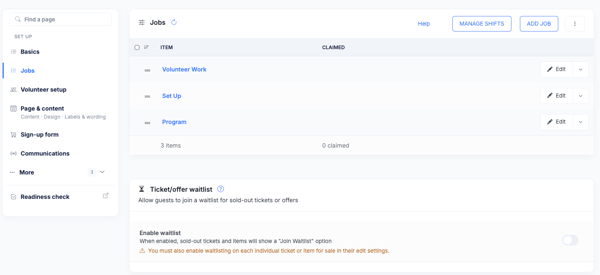
Volunteers sign up for jobs (the tasks you need help with) and, if your page has them, shifts (the dates and times). A volunteer page needs at least one job. Follow Creating Jobs and Shifts on a Volunteer Sign-Up Page to set these up and control how many volunteers can sign up for each.
Step 3b: Volunteer Setup (Volunteer Pro Feature)
This is for our Volunteer Pro accounts and you can see those options on that tab detailed in this article. See Volunteer Setup: Every Option for details
Step 4: Page & Content
If you are using or wanting a pretty landing page for your sign up and are not just wanting the sign up form, you can make your page design pretty by using some of the Page Design studio. If not, move to the next step to adjust your sign up form. Both the sign up form and the landing page have their own dedicated URL to share out.
Step 5: Sign-up Form
Checkout Form: Add any additional fields to the signup form that you would like to collect. If you are allowing them to sign up more than one person at a time, you can ask for specific individual information by adding those fields to the Volunteer Information box instead.
Volunteer Information: This is the information you are collecting from each volunteer if that person signs up more than one person at a time. To turn this off (if you are only wanting each volunteer to sign up themselves) simply scroll down and tun off the "Show Volunteer Info Setting toggle.)
Step 6: Customize your Communications
Your sign-up page sends emails to volunteers automatically, and you can add your own message to each one. Open the page’s Edit screen and click the Communications tab to see them. Use Preview Email to see how an email looks, and Suggested Content for ready-made wording to start from.
- Confirmation email. Sent when a volunteer signs up. Add a personal message with what volunteers need to know before they arrive.
- Shift reminders. Sent before each shift. By default, volunteers get a reminder 3 days and 8 hours before. You can add your own message, schedule more reminders, and choose email or text for each one. The reminder includes the volunteer’s shift details.
- Volunteer information request. If someone signs up more than one volunteer and details are missing, this email is sent automatically 10 days and 4 hours before the start time to ask for them.
- Thank-you email. Add a thank-you message to send volunteers after their shift.
- Text messages. If your organization has text messaging turned on, your page supports automated texts for volunteer check-in and shift activity, with ready-made templates such as Volunteers needed, Arrival details and Shift reminder.
You can also email volunteers any time from the page’s Communications tab. For setting up your own reminder schedule, see Configurable Shift Reminders.
Step 7: Activate & Share your page
- Hit Activate Volunteer Page. This makes your sign up page live and available for volunteers to begin signing up.
- Go to the Dashboard>Links/Embed/QR to share either or both the website url (campaign page) or the direct link to the sign up page (checkout page) so you can paste it into emails, social posts or your website. QR codes for both pages are available here as well.
- Embed it on your website. Go to the page's Dashboard and use Share/Embed Options to get an embed you can place on your own site.
- Link it from an event. If you chose a Linked event, the volunteer information appears on that event page for you via an added "Volunteer Opportunities" button. You may need to add this button in Page Design Studio if it doesn't appear automatically on your event page.
Before you share it widely, open the link in a private browser window to see the page the way a volunteer will.
Managing your pages
All your volunteer pages are listed under Volunteer Management → Review → Sign Up Pages. Use the Draft Pages, Active Pages, Inactive Pages and All Pages tabs to filter the list, and the search box to find a page by name.